
If you have at work, or at home, a Windows domain and you want to install your own Git server, Bonobo Git Server may be your choice, since it is easy to install, configure and administrate. I chose this Git server implementation at work, because it allowed us to use our Windows domain users and passwords without the need for creating new ones specially for the source control management tool.
Bonobo Git Server has a decent documentation, FAQ, and forum to help you while installing this software. I will include some steps from the installation guide, from the FAQ and I will add a few new steps for using HTTPS as communication protocol. Let’s start:
- Get the Bonobo Git Server from its website.
- Go to the installation guide and make sure that you have all the prerequisites properly installed and configured. In this case under Windows 7:
- Install IIS 7 on Windows Vista and Windows 7. When installing IIS7, leave the default options.
- .NET Framework 4.5. Install it using Windows Update.
- ASP.NET MVC 4. Install it using the standalone installer and don’t forget to register MVC framework with your IIS as explained in the prerequisite webpage:
- Windows 7. Following the same procedure that you used to install IIS 7, add the ASP.NET feature. IIS -> WWWS -> Application Development Features -> ASP.NET 4.5.
- Run from the command line with administrator privileges “%windir%\Microsoft.NET\Framework\v4.0.30319\aspnet_regiis.exe -ir”.
- Now, install Bonobo Git Server following its instructions.
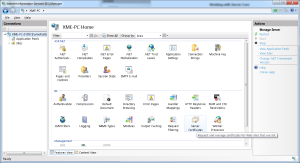
- To open IIS Manager, click Start, type “inetmgr” in the Search Programs and Files box, and then press ENTER.
- When converting the Bonobo Git Server into and application select as application pool: ASP.NET 4.0.
- Restart the computer and check that http://localhost/Bonobo.Git.Server is accessible.
- Now follow the Bonobo Git Server Windows Authentication instructions.
- In order to complete the section “How to configure IIS?”. Enable Windows and basic authentication. The complete path for Windows 7 and 8 is:
Control panel
Programs and Features
Turn Windows Features on or off
Expand: Internet Information Services => World Wide Web Services => Security
Select “Basic Authentication”
Select “Windows Authentication” - Restart the computer.
- Follow the “How to configure IIS?” instructions.
- Test the interface website works with HTTP.
- In order to complete the section “How to configure IIS?”. Enable Windows and basic authentication. The complete path for Windows 7 and 8 is:
- If the webpage does not show images, follow the FAQ answers for “Bonobo Git Server doesn’t server CSS”.
- Once the first user, which will be the administrator, is logged in at the interface webpage, set:
<add key=”ShouldImportWindowsUserAsAdministrator” value=”false” />
in both, server and interface, to avoid that any new user will gain administrator privileges. - If you want to secure your connection with HTTPS:
- Go to the ISS Manager and create a SSL certificate as explained in How to Set Up SSL on IIS 7 The Official Microsoft IIS Site. Section “IIS Manager” -> “Obtain a Certificate”.
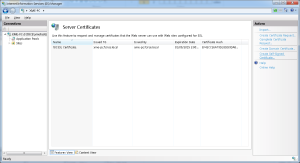
- Launch “Internet Information Services (IIS) Manager” (execute inetmgr) -> Select the Server field -> Server Certificates.
- Create Self-Signed Certificate. Use a descriptive name like “Git SSL certificate”.
- Launch “Internet Information Services (IIS) Manager” (execute inetmgr) -> Select the Server field -> Server Certificates.
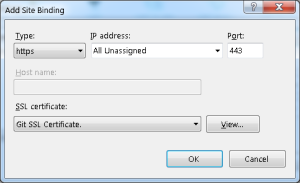
- Create an SSL Binding:
- Select the “Default Web Site” and click on “Bindings”.

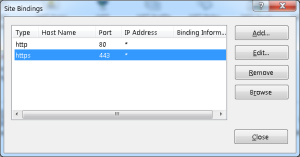
- Select “https” and your self-signed certificate at the bottom of the dialog.
- The result should look like this:
- Select the “Default Web Site” and click on “Bindings”.
- Require SSL for the Bonobo Git applications.
- Select the Bonobo Git Server application in IIS7.
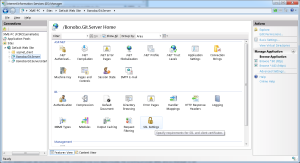
- Click on SSL Certificates, requiere SSL and accept client certificates.
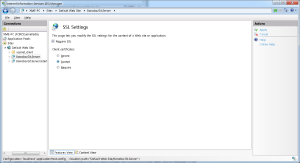
- Click on apply (top right corner).
- Do the same for the Bonobo Git Interface application.
- Select the Bonobo Git Server application in IIS7.
- Restart and you should be able to access the main Bonobo Git webpage with HTTP and HTTPS.
- Go to the ISS Manager and create a SSL certificate as explained in How to Set Up SSL on IIS 7 The Official Microsoft IIS Site. Section “IIS Manager” -> “Obtain a Certificate”.
- Self-signed certificates can not be validated and are ONLY acceptable for intranet purposes (never for public servers, since man in the middle attacks may happen). Git bash or any other client will complain (for example, see SmartGit SSL Certificate Problem). The solution is to disable SSL validation for each new repository manually. I know, it is a bit painful.
- Create a new directory called <project_name>
- Open Git Bash and browse to that folder or right-Click on the new directory and select “Git Bash Here”.
- Enter the following command lines:
git init
git config http.sslVerify false
git remote add origin https://<server_IP_address>/Bonobo.Git.Server/<git_project_name>.git
git config http.postBuffer 524288000 (see point 10)
Alternatively, you can use a small script to make this process faster, a bit better, and easier. Please, take a look at the user side post.
- To avoid crashes while making “big” pushes. Execute:
git config http.postBuffer 524288000
at the client side folder with Git Bash. See Bonobo Git Server FAQ. Apply all the changes in the section Cloning Error – RPC failed. - For uploading and downloading big chunks of data over SSL, you need to change (increase) your “uploadReadAheadSize”:
- Launch “Internet Information Services (IIS) Manager” (execute inetmgr)
- Expand the Server field -> Expand Sites -> Select the site you want to make the modification for (Bonobo.Git.Server).
- In the Features section, double click “Configuration Editor”
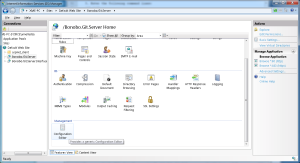
- Under “Section” select: system.webServer/serverRuntime
- Modify the “uploadReadAheadSize” section (“The value must be between 0 and 2147483647.”). Set it to 2147483647 (2GB).
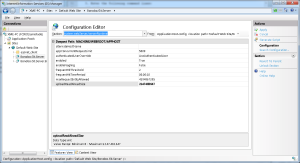
- Click Apply and restart the web site.
- Finally, it is mandatory to open the HTTPS port (443) in the windows firewall for allowing the connection of other computers to the Git Server. Open the Control Panel -> System and Security -> Windows Firewall, click Allow a program or feature through Windows Firewall and scroll down to “Secure World Wide Web services (HTTPS)” and check Domain and/or Home network (the most restrictive that works).
- Under Windows 7, there is a bug in IIS7 regarding SSL. Install Windows 7 patch KB2634328, or you will not be able to push/pull big files over HTTPS. See Bonobo Git Server FAQ.
Optional: - Change repository location. As a general policy, I always save data in other partition than “C:”. Go to the Bonobo Git Server Interface, login and click on settings.
- Change the repository location.
- Make sure ISS_ISURS have read/write/modify access to the new folder. See Bonobo Git Server FAQ.
- If you have old repositories, place them inside the repository directory and restart the Git server. They will be discovered next time the application starts.
Other problems: - When login with your Windows user, it may not work. Try to access the web interface with your credentials. If you are successful, use them to push and clone. If the credentials don’t work, try the following username scheme: DOMAIN\username or username@DOMAIN, and note that DOMAIN is not the name of your git server instance, but your intranet/Windows/ActiveDirectory domain. See Ad Authentication and Push.


Pingback: Installing Bonobo Git Server under Windows 7 with HTTPS and Windows authentication (user side) | XME Coding